 Just a preview of the posting bonus before its done to let you ladies see what your getting for doing the challenge!
Sunday, November 11, 2007
Preview of posting bonus
 Just a preview of the posting bonus before its done to let you ladies see what your getting for doing the challenge!
Friday, November 9, 2007
Tuesday, November 6, 2007
Holiday Grunge Alpha
 Yup, I didnt stop at the backpack I created a whole uppercase alpha to go with the Holiday Grunge Series! Not in the store yet as it destined to become a chat bonus!
Holiday Grunge Backpack
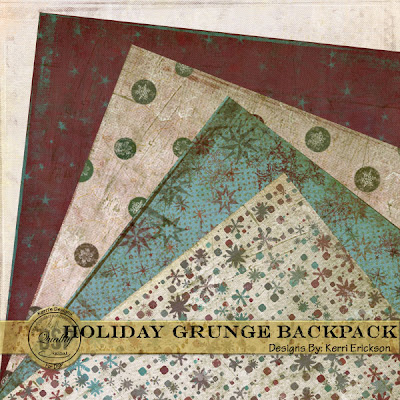
Here is the coordinating backpack for holiday grunge. Not in the store yet because it will be a future posting bonus for the kit challenge.
New Kit in the Store! Holiday Grunge
 Well all the ladies were asking for Christmas Grunge and I sure hope I delivered!
This is not your everyday average Christmas kit but it will make wrapping up your pictures so much fun. With backgrounds colored for the holidays and grungy elements this fun Holiday Grunge kit will wrap up any holiday or everyday pics with a new twist.
Kit Includes:
- ~1 Grungy red background
~1 Dirty diamonds green background
~1 Starry skies blue background
~1 Grungy snowflake notepaper background
~1 Striped folded grungy ribbon
~1 Grunged up matching bow
~1 Distressed chipboard Joy wordart
~1 Torn and folded snowflake
~1 Old star brad circle
~1 Hand doodled swirls and stars overlay
~1 Stitching with premade holes
~1 Torn and grunged star frame
Get it now in the store here!!!!
Saturday, November 3, 2007
New DSP Poll - Vote!
Ok you all asked for it so I did it! You ladies wanted to do a poll to choose the next kit for the challenge dated Nov10-24. Go vote it closes on the 8th and the results will be announced at the Friday Nov. 9 chat!
Click here to vote and post your comments!
These are the three kits offered for the challenge:


Click here to vote and post your comments!
These are the three kits offered for the challenge:


Monday, October 29, 2007
Its official! Im a Digital Scrapbook Place Designer!!!
Well after a long time of learning, waiting and holding my breath, I am officially a DSP designer!
Please come check out my challenges and my kits in the store now! Click here to see them!
Please come check out my challenges and my kits in the store now! Click here to see them!
Sunday, October 14, 2007
Miss Mini with her priceless pout
Heres my youngest giving me grief and putting on her famous pout she has. I just had to get a pic of her doing this and caught it perfectly one night while she was in her turnaround.
All of the papers and elements are my creation.
Hope you like it!
Saturday, October 13, 2007
What American accent do you have?
| What American accent do you have? Your Result: The Inland North You may think you speak "Standard English straight out of the dictionary" but when you step away from the Great Lakes you get asked annoying questions like "Are you from Wisconsin?" or "Are you from Chicago?" Chances are you call carbonated drinks "pop." | |
| The Midland | |
| The Northeast | |
| Philadelphia | |
| The South | |
| The West | |
| Boston | |
| North Central | |
| What American accent do you have? Quiz Created on GoToQuiz | |
How true is this! I dont say grab me a soda, or grab me a coke, nope! I say grab me a pop? How on earth can this thing be right?!?
Blogged with Flock
Friday, October 5, 2007
New Kit finished - Can you name it?
 Here is my newest kit all finished. With torn old paper, torn and stained cardboard, grungy old stapled and folded ribbon, and other very old weathered elements, this kit is complete with grungy heavily textured backgrounds.
I have no idea what to call this kit??? Any ideas? If you do please send them too me. If your name gets chosen you will get a surprise freebie! Dont worry you will be pleasantly surprised!
If you like this kit please drop me a comment I love to hear from people.
Tuesday, October 2, 2007
Dotted Doodles Freebie

These dotted doodles were fun to make and will add whimsy to any layout. Use them as stamps or make them into a brush.
Get them here
New Kit in Progress....
 Well here is my newest kit...in progress as there are a few more things that need to be done like a folded ribbon I havent finished. I have been really wanting to do a grungy old cardboard kit and this is what I have come up with. Its a break from my other kits that I have been doing and I have really had fun going in a different direction.
It will get more color from the folded ribbon that is the same color as the turquoise paper but I am thinking I should change the overall hue of the small piece of paper because it kinda gets lost on the grid paper. I may make the flourish a tidge smaller and make a cardboard hang tag instead of the brad...dunno just thinking out loud and thats what I love about blogging :)
Its still in progress like I said but wanted anyone who stops by to leave me some feedback since this kit is so out of my element. Any thoughts? Comments? Additions/subtractions you feel will add to the kit? I am pretty happy with it but thats just me :)
Saturday, September 29, 2007
Modern Elegance Page Kit Freebie!

I said it may be available in the future and guess what? It is! Grab up this kit with a stuffable envelope, gorgeous pastel hues, and fun ribbon with matching bow.
Get it here and please if you snag it lemme know :)
Another new Page Kit...Turquoise Blues

And here is yet another page kit. This one I call Turquoise Blues, for obvious reasons, because there are lots of blues and multiple elements inlaid with turquoise. This kit is rich with golds and has a stitched ribbon with realistic shadowing making it jump off the page(difficult to see in the preview here). The papers are deeply textured and have plenty of depth of color. To top it off you have a turquoise flourish trimmed in gold. Any thoughts? I hope you like it! Of course any comments or suggestions are welcome.
Girly Grunge Page Kit
 Here is another kit I got done. Its called Girly Grunge and I love it. I need to make some more realistic shadows on it to really set it off but I totally love the frayed frame. What do you think? Any comments are appreciated.
Friday, September 28, 2007
Funky Fun Page Kit Freebie
 Funky Fun is full of funk and fun! With lots of whimsical elements, funky textured papers, and a large leather hole punched mat you will have lots of fun working with this kit. Note paper has a realistic shadow on it to appear that its crinkled and setting off the page. Enjoy and leave me a comment if you snag it!
Get it here
The Vineyard Page Kit

The Vineyard is inspired by my love of wine and shows its variety with chardonnay colored yellows, burgundy merlots, and deep bordeaux with lots of texture and depth just like a good wine. This kit is versatile and fun with some gorgeous realistic elements.
Rusted Metal Page Kit

Here is the latest kit I have done. Its not up for sale as of yet because I dont yet have a place to call home. I am currently striving for a position at Digital Scrapbook Place and am working with a fantastic designer there to help me along and get ready for that position. Any comments or critiques? Be nice now LOL.
I really strive to not make my kits cookie cutter if you know what I mean. I dont have 12 elements all recolored and 14 papers that arent well thought out. I concentrate on a set number of items in each kit that are high quality and not exact design replicas that have simply been recolored.
Tuesday, September 25, 2007

I havent posted lately and wanted to start updating my blog so here are some freebies. I will be adding daily now that I am caught up at home!
Here are some doodles that I hand drew in my artrage program. They are in png format and all on the same file so to use them seperately just use your lasso tool in your program like photoshop and cut them and make them on their own layer and save it as a new file. If anyone needs help just let me know and maybe that can be a new tutorial that I can do.
Do with them what you will. I just ask that you dont use them for profit in any way. Simple right!
Enjoy
Get them here
Saturday, April 28, 2007
New Kit 4 SNL Challenge *Modern Elegance*
I recently finished a kit for DSP(the link to dsp is in my links list at the side----->). Its for the SNL challenge and has a set of colors that we are given. Its the first time I have participated and really enjoyed being apart of it. I think I will continue to do so while sharpening my design skills. In order to get this kit you must partake in SNL and upload your designs to it.
Thursday, April 26, 2007
Rounded corners TUTORIAL for PS CS2
Dont ask me how amidst all my designing that I ended up doing a tut on rounded corners but I did and so that it doesnt go to waste here it is. I hope it can help someone out there who is new to ps cs2 and or rounded corners.
Now please keep in mind that this is not the only way you can do rounded rectangles in cs2. Its just my preferred way and therefore how I chose to share it. My way is a bit longer than the other way but gives me more control over my final result as oppose to using the marquee tools.

Below you can see my settings
Now go ahead and chose your paths palette and click on load path as a selection. See photo below.
Here is my final result with a drop shadow added. How did you do???
Any questions or problems? Just drop me a line and I will answer you as I can.
Now please keep in mind that this is not the only way you can do rounded rectangles in cs2. Its just my preferred way and therefore how I chose to share it. My way is a bit longer than the other way but gives me more control over my final result as oppose to using the marquee tools.

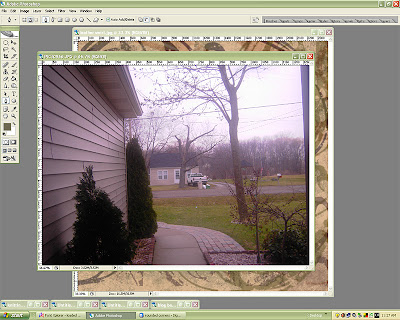
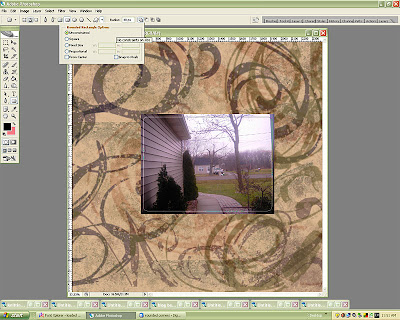
Ok in the above photo I have opened ps cs2 and have two images open. My background image and my photo that I will put rounded corners on.
My next order of business is to drag my photo onto my background so go ahead and select your little arrow tool (I will assume you know which one I mean) and drag your photo onto your background. This will put your photo on its own layer and you can now close out your original photo layer.
This is what I have now. (Please keep in mind that my photo is much smaller than my background photo so that you can easily see both)

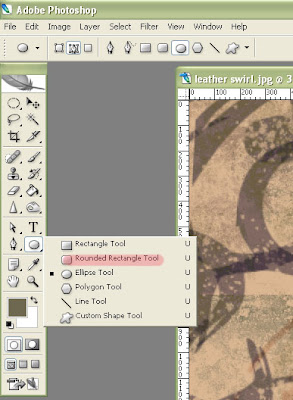
Now we need to select our rounded rectangle tool and give it the correct settings. So select your rounded rectangle tool which is highlighted in the below picture.

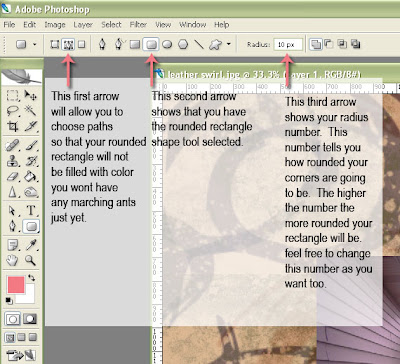
Great now lets give our tool the correct settings. In the picture below you will see that I have a few things pointed out. I have explained what they are in the picture itself. So go ahead and select those settings now. Please feel free to choose any radius number that you like. For purposes of this I chose a radius of 40 but you can choose whatever you like.

Below you can see my settings

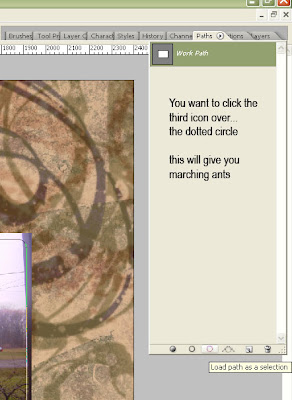
Now go ahead and chose your paths palette and click on load path as a selection. See photo below.

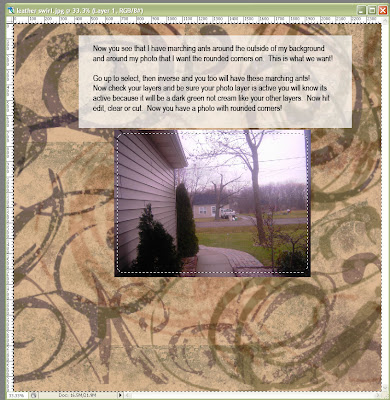
Now that you have done that you will have the marching ants but only around your photo. We dont want that because it would delete your photo so we want to inverse our marching ants so they are around our background and our photo. This means that if we were to delete any portion of our layer it would be what is between the ants. If your lost dont worry now is when the magic happens. Follow the instructions in the next photo and you will have your rounded corners on your photo.
You will simply go to select>inverse (ctrl +shift+I) and your photo will match mine with marching ants surrounding both your background and your photo. Then be sure your photo layer is higlighted, then go to edit>cut or edit>clear.
You will simply go to select>inverse (ctrl +shift+I) and your photo will match mine with marching ants surrounding both your background and your photo. Then be sure your photo layer is higlighted, then go to edit>cut or edit>clear.

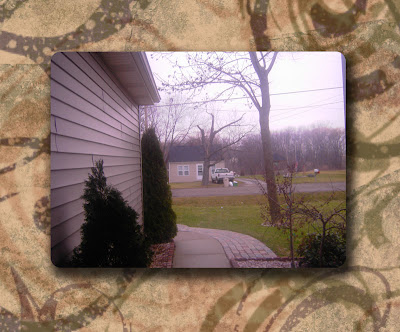
Here is my final result with a drop shadow added. How did you do???

Any questions or problems? Just drop me a line and I will answer you as I can.
Friday, April 20, 2007
Freehand blues *new kit*
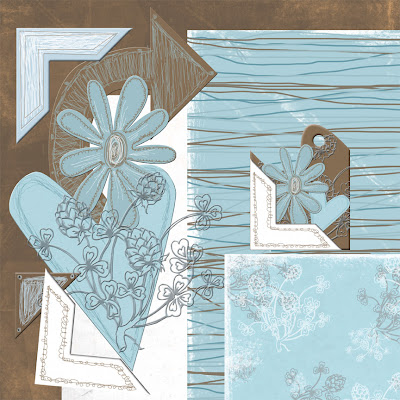 And yet another kit that I am working on and will be available soon. I love the blues and pinks coupled with chocolate so that is what this kit is ispired by. This kit has a very hand doodled feel to it as everything was done by me freehand with my wacom tablet and pen. All shapes and everything were done by me as well with paths in ps cs2. Any thoughts?????
New Kit preview - available soon!
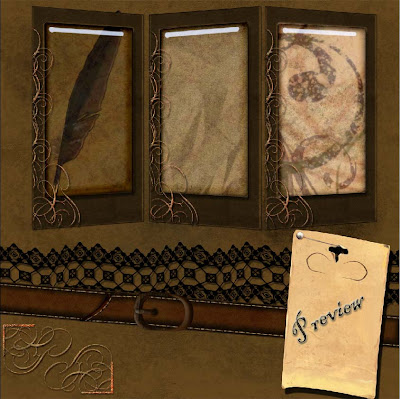 Just wanted to update and let everyone see what I am finishing up. This kit should be available in a few days so check back to grab it cuz its an awesome FREEBIE!!!
Included in the kit so far are
1 leather background
1 crinkle paper bg
1 multi color grunge swirl bg
1 wavy black lace element
2 rusted pitted metal scroll corner elements
1 pearl stick pin element
1 old torn beat up tag element
1 feather pen element
1 leather strap with a rusted metal buckle element
1 set of 3 photo frames.
The frames will be connect as if they were like the ones you see in the store that can be adjusted as needed. I just need to make the hinges to go on the photo frames.
Lemme know what you think??!!! Thanks for stopping by!
Kerr
Subscribe to:
Comments (Atom)


